
How to Grow Kale From Seed - A Comprehensive Guide

A Gardener’s Guide to Growing Kale From Seed
Kale is a cultural icon. From smoothies, to chips, to massaged or simply sauteed with a little bit of garlic, kale is a major force in the food industry. Being that you eat it all the time, have you ever asked yourself, “How can I grow kale from seed?” Well now you have and we’re glad you did, because growing kale is a really easy thing to do! Whether you’re working with a small container growing space or a large, sprawling backyard garden, you can grow this delicious, nutritious, and popular green at home.
Kale has become a staple in home kitchens for a reason. It’s extremely nutritious as it’s loaded with vitamin C, vitamin K, antioxidants, and more. Besides that, it’s extremely versatile. The thick, toothsome green can be massaged into an easily chewable raw salad or thrown straight into a soup or stew where it cooks down and becomes delicious and tender.
As with many popular food items, kale can be a little pricey in the grocery store or at the farmer’s market! However, this vegetable can be easily grown at home.
Understanding the Germination Process of Kale Seeds
Kale can be started from seed in two ways. First, depending on your growing zone, kale can be direct sown outside in mid-spring or late summer. When direct seeding kale, you can grow it for its young shoots, also known as “baby kale,” which are delicious, tender, and extremely dense in nutrients. Alternatively, you can direct seed your kale and grow it to maturity where you can be harvesting leaves off its leggy stalk for months at a time.
If you want to extend your growing season, you can seed kale indoors in early spring, growing it for several weeks before it’s warm enough to be outside. This makes it so that you start harvesting greens sooner than if you were to direct seed outside. It also offers your seedlings a better chance of survival because they are stronger and more mature when introduced to the elements. Kale seed germination tends to be pretty reliable, but there are some tips to help ensure your kale seeds germinate well.
Kale is a cool season crop that can withstand some frost once it’s mature. This makes it especially great to plant in the fall so you can harvest greens longer into the winter than some other crops. The ideal soil temperature for germinating kale is about 60 to 65 degrees. This temperature is pretty easy to do in your home at any time of year but could involve some waiting for the weather to warm in the spring if you’re looking to direct seed.
Kale likes to germinate in soil rich in organic matter. Whether you’re germinating in a sterile seedling mix or outside, be sure to add plenty of nutrient-rich compost or worm castings to ensure healthy plants.
This crop also likes to be well-watered, especially in order to germinate. Keep your seeds watered consistently and evenly until germination, typically checking on them twice a day. Once the seeds germinate you can water once a day.
Kale seeds tend to germinate quickly, in about three to twelve days, depending on conditions. If seeds have not germinated within this time frame, reassess your conditions and re-seed!

Step-by-Step Guide to Sowing Kale Seeds
These are small seeds. When direct sowing kale seeds, plant the seed ¼ inch deep. Space the seeds three inches apart and as the seeds mature, thin them to six to nine inches apart. Mature spacing is 18 to 24 inches apart.
When planting kale seeds indoors to be transplanted, seed two to three seeds per cell or pot. After germination, select the strongest one and clip the other at soil level. You most likely won’t get 100% germination, but this will ensure that all of the cells you plant (and expect to have seedlings from) will indeed produce.
Seedling Care for Healthy Kale Growth
Caring for kale seedlings is very similar to other types of seedling care. It is a fairly simple process, but here are some basics to keep in mind.
Light
All seedlings need light to grow and, unless you’re starting your seeds in a greenhouse, the natural light that’s typically available in your home is likely not going to be enough. That’s why we recommend using grow lights! As a rule, keep your grow lights approximately four to six inches above your seedlings at all times, raising them as they grow taller. We recommend LED lights. They’re pricier but they last longer and use less energy.
Most seedlings need about 16 to 18 hours of light per day, so set your grow lights up with a timer to ensure they’re getting enough!
Water
Water is of the utmost importance between seeding and germination but continues to be important throughout the life of the plant. Seeds need a lot of water to germinate and awaken them from their dormant state. Water makes the seed coat swell and softens it so that the embryo on the inside can pop out and root into the soil. Not watering enough makes it so that the embryo is unable to pop out! Water your seedlings twice a day, ensuring that they are not soaking wet, until germination. After the seeds germinate, you can water well once per day.
Temperature
Kale is a cool weather crop that germinates best in soil that is 60-65 degrees Fahrenheit. If you’re seeding indoors, you probably do not need to use a heat mat to ensure this. If you’re seeding in a shed or garage that is not temperature controlled, just be sure to watch for freezing nights, as this can kill tender seedlings.
Airflow
Airflow is important for all seedlings! Having a window cracked in warmer weather or a fan running in the room can ensure that your seedlings don’t suffer from fungal diseases early on in life, making for stronger mature plants.
Kale seedling maintenance is super simple and can be done by even the most beginner gardeners. Don’t overthink it — your seedlings want to grow!
Transplanting Kale Seedlings: When and How
Kale can be transplanted outside four to six weeks before your area’s average last frost date. This can be pushed a little earlier with season extension measures such as frost cloth or low tunnels.
When transplanting kale seedlings, you’ll want to be mindful of spacing. Mature spacing is 18 to 24 inches apart. Transplant seedlings at this distance in the garden or into pots that have at least a two foot diameter.
Don’t bury the stem, but plant the seedlings so they are buried only about a half inch under soil level. This is enough to ensure temperature fluctuations don’t push the transplant out of the soil but not too much to rot the stem.
Hardening Off Kale Plants Before Transplanting
Hardening off is a process you should do with all seedlings grown indoors. Starting seeds indoors is a great idea to lengthen harvest times and make sure you’re producing strong plants, but like all coddled babies, they need to be introduced to the elements slowly to ensure they grow successfully!
The process of hardening off prepares kale seedlings for being outdoors. Start a week or two before you’re ready to transplant. Take your seedlings and set them outside for an hour. The next day, set them out for two, and so on and so forth. Slowly extend the times until they’re spending an entire day outside, continue to bring them inside as the sun goes down. This practice slowly introduces your seedlings to the elements and ensures they don’t experience transplant shock when planted outside.
Thinning Kale Seedlings for Optimal Growth
Thinning is the practice of clipping seedlings at soil level in order to correct the spacing of your plants. When you seed multiple seeds per cell and clip them until there’s one, this is thinning. When you direct sow close together and clip seedlings as they grow to ensure correct spacing, this is thinning. Thinning seedlings is done for a few different reasons.
- The reason we clip seedlings instead of pulling them out is to not disturb the roots. Young seedlings have very delicate root systems and so to pull out one may disturb the other that you are hoping to preserve.
- Thinning helps you get the right spacing with healthy plants. For the same reason you’d plant multiple seeds per cell (to ensure 100% germination, or close to it), you’d plant seeds close together, and thin until maturity. This means that you can choose the best looking plants as they all continue to grow and not risk ending up with fewer less-than-healthy plants.
- To plant close together and not thin would mean you’d have a lot of crowded, most likely unhealthy plants. Plants that are too close together compete for nutrients and spread fungal diseases due to the lack of airflow. The only situation you would not want to thin seedlings is if you’re looking to harvest baby kale. These plants will not reach maturity and do not need the spacing of a mature plant.
Kale plant spacing is important to ensure healthy, full-sized plants that do not need to compete with each other. Thinning seedlings helps make this happen!
Best Fertilizer Practices for Kale Plants
There are many commercial options that can be used as a fertilizer for kale plants. Typically you’d want to look for a fertilizer high in nitrogen. Nitrogen supports the growth of luscious foliage which is perfect for all those cool weather greens. Consider fertilizing once every four weeks with a nitrogen-rich fertilizer and every other week with fish fertilizer!
When feeding kale, it always helps to start off the season strong. A few weeks before planting, amend the soil with a few inches of compost just to make sure you’re planting your kale starts into nutrient-rich soil.
Companion Planting with Kale: Dos and Don'ts
Companion planting with kale can create a garden ecosystem that is beneficial to all of the plants involved! Companion planting is the practice of planting different crops near each other that help each other grow. Depending on the pairing, the league can tackle pests, nutrient requirements, pollination needs, or help maximize space!
Kale happens to be a wonderful companion for many crops. Kale’s garden companions include:
Marigolds
Marigolds are a well-known and loved companion plant to many allies. The pest-repelling traits of marigolds are well researched and known to repel below and above ground pests of many kinds. When intercropped with kale, marigolds have been shown to reduce aphid populations.
Cilantro
The scent of cilantro is widely known to repel pests on its own. However, when it sends up its lacy white flowers, beneficial insects from near and far come traveling to that bolting cilantro. Further, tucking cilantro plants or seeds under the cover of tall, wide kale plants can help delay the bolting process in the spring or slow it in the fall. The shade of the kale helps to keep the cilantro cool. This benefit goes both ways.
Bush Beans
Consider intercropping (or crop rotating) with legumes! Legumes of all kinds fix nitrogen in the soil, revamping it for crops to come. When companion planted with kale, bush beans help make nutrients more readily available.
Leeks, Garlic, and Scallions
These strong-smelling alliums are well known for keeping pests at bay. Would you want to hang out in a room filled with onion breath? Neither do your garden pests. Their benefits depend on the time of year, too. Plant your kale into your garlic bed in spring. Looking to protect your fall crop? Leeks can stay in the ground far into the winter.
Radishes
This crop can easily be planted in rows between your kale. They mature quickly, can be kept cool under the shade of the leaves, and are unlikely to compete for nutrients. This is a great intercrop pairing for when you’re working in a small space.
What Not to Pair With Kale
Don’t plant too many brassicas in one place. We gave radishes a pass above because they’re so quick and easy, but long-season heading brassicas all right next to each other will likely result in a chlorophyll bloodbath, as the cabbage loopers, aphids, and other pests will have their meals available all in one place.
Avoid planting kale next to other heavy feeders like corn and tomatoes. These crops all take a lot of nutrients to grow and will end up competing with each other, resulting in malnourished crops.
Planting kale next to or in between other tall plants like pole beans or sunflowers can result in stunted growth due to not getting enough light. Avoid planting kale next to things that will shade it out.
Watering Requirements for Healthy Kale Plants
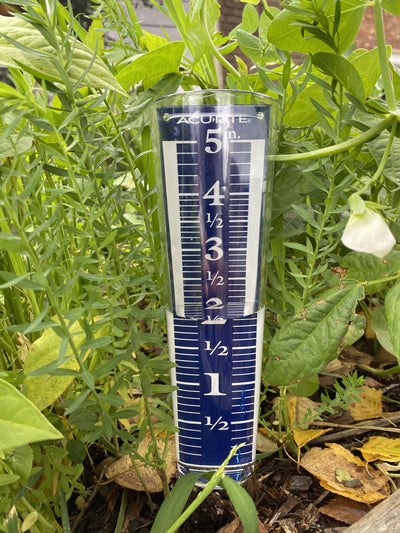
The watering requirements for kale are not excessive. A steady amount of water throughout the growing season will keep kale healthy and sweet. Typically kale, like most vegetables, grows best with an inch to an inch and a half of water per week. Keep your kale plants evenly moist but not overly soggy.
Keep an eye on your rain gauge. During times of drought, be sure to keep irrigating your kale plants. Mulching around your plants can help to hold moisture in and keep weed pressure down.
Protecting Kale from Common Pests
There are many common pests of kale to keep an eye on in the garden. With most pests, if you catch the problem early, you should be able to save your harvest!
Aphids
Aphids are one of the most common pests you’ll come across in the garden. They love the same thing we love in our kale — succulent foliage. A heavy stream of water from a hose sprayer can help dislodge aphids from the plant. They have a hard time climbing back up. If the infestation is really severe you can apply neem oil or insecticidal soap bi-weekly to help keep populations low.
Cabbage Loopers
Cabbage loopers are the larvae of the cabbage moth — a white or brown moth that you’ll often see dancing around your cruciferous vegetables, laying their eggs. The eggs are laid on the undersides of leaves, and when they hatch, a little green worm emerges to munch on the foliage. They camouflage effectively, but their calling card are the dark green droppings left towards the crown of the plant. Finding and squishing the eggs early can keep populations at bay, but if the infestation gets out of hand you can apply Bt, which kills them in their larval stage.
Mites
There are a lot of different types of mites, but spider mites are some of the most common. They leave a web-looking substance on the stems of your kale plants. They thrive in hot, dry weather so keep an eye on your kale during droughts. They can cause yellowing leaves and sickly-looking plants. Like aphids, they’re a sucking pest. They can be treated similarly to aphids through dislodging them with a hose or neem oil applications!
Slugs
Slugs love to munch a wide variety of crops and kale is not left off of the list. They tend to leave a lot of oddly shaped holes in the leaves with seemingly no pattern, and you often cannot immediately identify the source. This is because slugs tend to come out in the early evenings when temperatures are cool and go back to their homes during the day when you’re likely doing your investigations.
There are many different well known ways to treat slugs. Some popular ones include encircling your plants in diatomaceous earth or wood ash. You can also try beer traps or other popular treatments!

Harvesting Kale Leaves: Techniques and Timing
It can take about two months for kale to become mature enough for you to start harvesting the leaves. You’ll know when to pick kale by checking the days to maturity listed on your seed packet. Kale is biennial, so it can be grown through the entire summer, but typically heat or pests get to it before you can. When you’re growing kale for a fall crop, the frost actually makes the leaves sweeter — so harvesting into the winter is a delicious idea!
You can harvest young kale leaves to use raw in salads or on sandwiches. As the plants mature, the leaves become crisper, thicker, and stand up to being cooked very well. The older the leaves are, the tougher they become. Harvest the leaves from the bottom first as kale will keep producing at the top. Don’t harvest more than one third of the leaves at a time. When harvesting kale leaves, you want to leave enough of them so that the plant can keep producing. Snip the leaves off the base of the stem, leaving about a quarter inch of length at the main stalk. Kale leaves will keep in the fridge for about a week.
Start Your Kale Growing Journey with Sow True Seed
Ready to get growing? There are many types of kale to choose from. Sow True Seed offers a wide range of kale varieties that are all delicious in their own way. Planting kale seeds is a garden endeavor you will not regret, so start growing kale today! Here are some of our most popular kale varieties:
Lacinato
Lacinato kale is an heirloom variety and popular among Italian chefs. It’s also extremely popular with kids for its nickname: Dinosaur Kale. It’s named for its dark green, deeply savoyed leaves that conjure images of prehistoric flora. A particularly tender and delicious kale, Lacinato is a great choice for gardeners and chefs alike!
Red Russian
Another lovely heirloom that’s a great choice for eating raw. Red Russian kale has delicately lobed leaves that change from a lovely gray to purple as the weather cools.
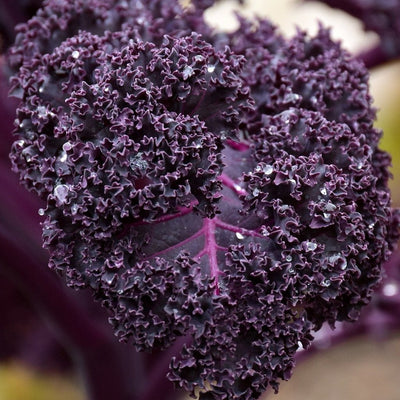
Scarlet
Scarlet kale is a stunner with its bright purple color and heavily-curled foliage. It grows to nearly three feet in height and becomes a more vibrant color as the temperatures cool. Because of its color, Scarlet kale has more antioxidants than other varieties of kale. This amazing crop doubles as an ornamental variety as well!

|
Article Written by: Hannah Gibbons |
|
About the Author: Hannah Gibbons, an employee at Sow True Seed since 2020, has nearly a decade of experience in the agricultural industry. Their passion for environmental education and regenerative agriculture has been the cornerstone of their work, aimed at making gardening accessible to all. |